Every school, political campaign, ministry, or other nonprofit needs a way to receive donations online.
If you have a Squarespace website, but don’t have a donation platform, this article is for you. We’ll show you exactly how to add a donate button to your website, from end to end.
Why online fundraising is important

Before we get to that, let’s go over a couple reasons why you need a way to receive donations online.
(If you are already convinced, go ahead and scroll down to the “Choose the donation platform” section and learn how to add the donate button to Squarespace).
→ Learn about the 4 things nonprofit organizations need to know about online giving
Online fundraising is convenient
Did you know that 85% of Americans have a smartphone?
That means hundreds of millions of people can donate to organizations directly from the palm of their hands. All they need to do is enter in payment information and send the donation.
Beyond direct donation, online fundraising makes things more convenient with tools like automated recurring giving. This is something that donors can set up and securely give a pre-set amount of money on a recurring basis.
Online fundraising cost-effective
While online donation payments include processing fees, the cost/benefit almost always balances out.
For example, if someone donates $100 to your organization and the processing fee is 4%, that means that you will receive $96.
Online donations are usually donations that wouldn’t be given in person. So for the example above, don’t think of it as losing $4. Think of it as gaining $96 that you wouldn’t otherwise receive.
Now that you know a few of the benefits of online fundraising, here’s how to add a donation button to your website.
Choose the donation platform

The first step is to sign up for a donation platform. This platform will provide your donors with a way to send money to your organization.
Choosing an online donation platform might be the most overwhelming step because there are so many options. Which one is the best for your organization?
There are a few things to think about when choosing an online donation platform:
Does the platform have monthly or hidden fees?
There are several fundraising platforms that seem great at first glance, but once you dig into the details, you find out that they have monthly fees, signup fees, contracts, and other hidden costs.
→ Anedot does not have any monthly or hidden fees. Our pricing is straightforward and customers are never surprised with unexpected charges.
Does the platform have fundraising tools?
It’s important to choose a platform that goes beyond simply payment processing. While it’s nice to be able to receive donations online, fundraising is more than that.
You need tools to help grow a base of regular donors, generate end of year donation statements, receive donations through text, and so much more.
Does the platform have reliable customer service?
While there are many platforms that include great customer service, they usually come with a hefty price tag or require an annual contract.
On the other hand, platforms that are free to use typically do not include any customer service or support. Make sure you choose a platform that has both low costs and great customer support.
We proudly do not charge monthly fees AND we have the best service team in the business (ask around and see for yourself).
Install the button on the site

1. Copy the URL of your donation page
The first step is to get your donation page’s link. This part should be fairly simple.
Just navigate to your donation page, then hover over the URL in your browser’s address bar. Select the link, right click, then click “Copy.”
You can also use the keyboard shortcut, “ctrl + c” if you’re using a Windows computer, or “command + c” if you’re on a Mac.
2. Add the URL to a menu item
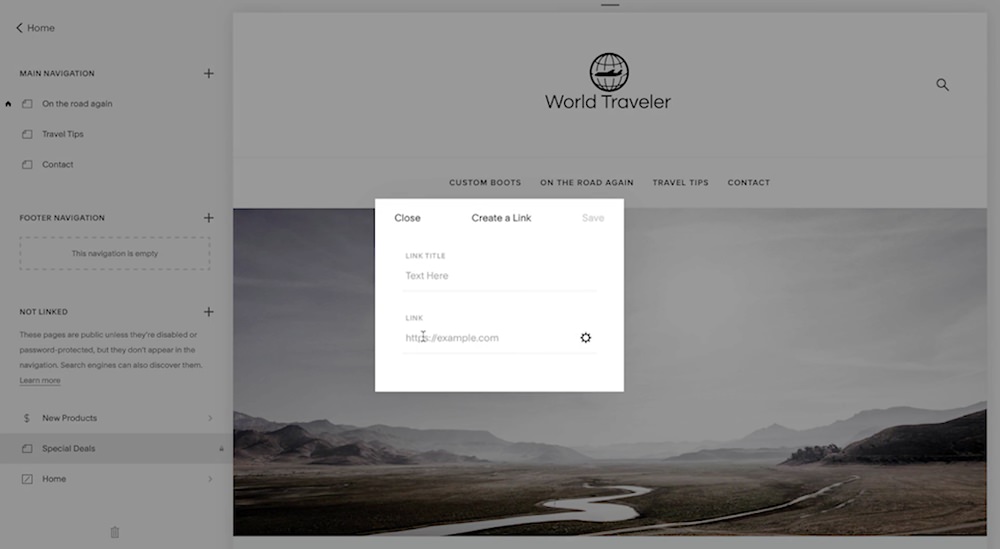
The next step is to add the URL of your donation page to a button on your Squarespace site.

Follow the instructions on how to add a new link on Squarespace. Look for the “Link to a web address” section. Once you follow those steps, you’ll simply need to paste the URL that you copied in Step 1.
3. Publish your Squarespace site
After you save the new menu item in Squarespace, it’s time to publish.
Before you publish the changes to the live site, make sure the new link works and that everything looks correct.
That’s all there is to it!
→ Check out 6 social media marketing tips for nonprofits
Promote the site

The last thing to do is to promote your site. You can design a beautiful website with a fully optimized donation page, but you won’t get any donations unless people see it.
Spread the word about it through email newsletters, social media posts, or through direct mail. You can even run paid advertising encouraging people to come to your website and make a donation.
Regardless of your distribution method, make sure people know about your website and how they can support your cause.

80 Community Service Ideas for Nonprofits


